Are you interested in expanding your business’s online presence, and attracting returning customers along the way? It may be time you considered deploying Dynamic Product Ads on Facebook.
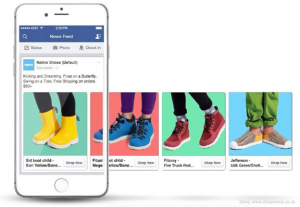
As this image shows, social media advertising is among the largest and fastest-growing platforms for businesses to thrive in online marketing. Dynamic Product Ads, when used on Facebook, can be fantastic tools for keeping interested customers invested in your products.

In this article, we will guide you through the steps to build Dynamic Product Ads using the tools available through Facebook Pixel. This will drive loyal client traffic to your products and business websites!
Contents
What is a Dynamic Product Ad?
When customers visit your site, Facebook will be able to “retarget” them by displaying Dynamic Product Ads. These ads feature products designed to attract returning customers based on similar products they have already bought or taken an interest in.
Whether the customer has merely viewed your content, stopped just short of purchasing, or completed a transaction, Facebook will recognize his or her interest. This recognition allows for the effective use of Dynamic Product Ads in retargeting these customers for a returning purchase.
It’s one thing to be able to attract customers for a one-time purchase. With Dynamic Product Ads, you can increase the chances of customers returning time and time again.
How to set up Dynamic Product Ads on Facebook
Here are the four basic steps to setting up effective Dynamic Product Ads.
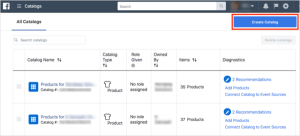
1. Adding a Product Catalog
In order to provide the content necessary for Dynamic Product Ads to retarget clients, your product catalog must be available on Facebook. You can achieve this by using your Facebook Business Manager account.
When you enter your Business Manager page, you should be able to find underneath the “Assets” header an option to click on “Product Catalogs.”
Here you can “Add New Product Catalog” and then “Create New Product Catalog” from the dropdown options. Once you have named the catalog, you can click “Create Product Catalog.”
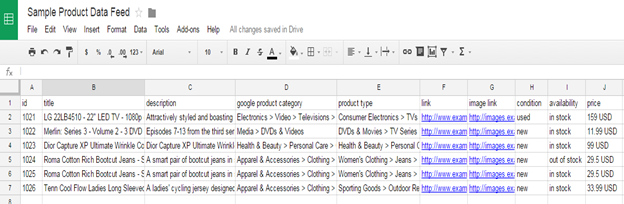
2. Uploading Your Product Feed
Now that you have established the product catalog as a place where your products will appear, it is time to upload the products themselves. You have total liberty to categorize your products in as many groups as you like. Facebook will be able to target customers according to their searches, and the more specific you are, the better.
The best way to format your product feed is in a spreadsheet where all essential details about your products are visible. CSV, TSV, RSS XML, or ATOM XML files can get this job done best.
Once you have created your product feed, you will need to upload it to Facebook. A great place to start would be to save the spreadsheet in cloud storage sites like Dropbox or Google Drive. The Facebook Product Feed app is also available for a fluid and intuitive upload.
Now that your product feed is stored in the cloud, return to Business Manager. Under “Product Catalogs” you will see “Add Product Feed.” Click here and then adjust the settings to reflect your preferences such as product name, currency, and upload type.
Recurring uploads and single uploads are the two types of upload Facebook has available for you to choose from at your own discretion. Both are useful, but the former will update itself according to changes in your product feed, while a single upload will require manual updates whenever such a need arises.
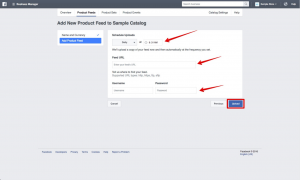
If you select recurring uploads, you will then need to schedule how frequently you would like your feed to update. Once you have done that and included a link to the feed’s URL, just click “Upload.”
3. Using Facebook Pixel
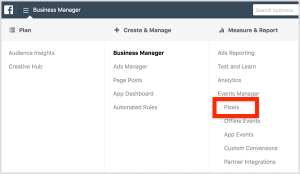
Facebook Pixels are the codes that track visitors to your website, which enables Facebook to retarget the customers according to their products of interest. Once again, we want to build loyalty with your clients so they continue to return to your business and make purchases. These Facebook Pixels through retargeting will be instrumental in creating this customer dynamic.
You will be able to find them in Facebook Business Manager. Under the navigation bar, you should see “Assets,” under which you can select “Pixels.” Then select “Create a Pixel.”
Once you have named and created your Pixel, save it. Now it is set up and linked to your Dynamic Product Ads.
The last step you need to take entails placing the pixel on your business’s website. To finish setting up Pixel, repeat this process as needed in between the <head> and </head> tags on other site pages.
4. Creating your Dynamic Product Ad
You’re almost there! Now it’s time to create a Dynamic Product Ad that will bring customers back to your website repeatedly.
First you will need to go to your Facebook Power Editor and click “Create Campaign.”
There you will also select “Promote a Product Catalog.” Remember your product catalog from the first step? Time to make use of it!
(If you run into trouble with Power Editor, don’t fret! The new version does not contain an option for Dynamic Product Ads. However, once you click “Continue” a view of the older version will reappear and enable you to proceed without issue.)
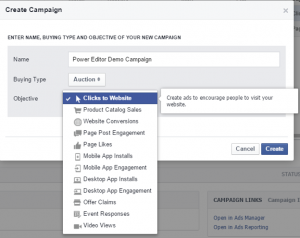
Select “Product Catalog Sales” as your campaign objective and then click “Create.” Now you can customize your ad campaign by adding a descriptive name, setting a budget, and verifying your business information.
Additionally, you can distinguish which products you will run ads for according to different filters, each available under the “+” option beneath “Promoted Products.”
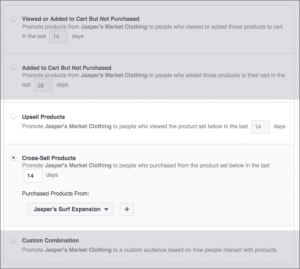
In addition to the help Facebook Pixel will provide you in retargeting customers with interest in your products, you have the option to participate in this process manually. Under the “Audience” tab you should see options to “Upsell” or “Cross-Sell.”
These options allow you to target ads towards customers according to their prior searches and purchases. Don’t be afraid to experiment and play around with your ad campaign, it is yours to control, after all!
Now it is time to finally run your Dynamic Product Ads. Under the “Ads” tab you will be able to create a new ad or select a previously made one.
Once you have done this, add a keyword to the ad according to the information you already provided in the headings of your spreadsheets earlier to ensure Facebook will properly present the ad you want to run. You can also accomplish this through the “+” option.
Conclusion
Congratulations! It has been a long journey, but you have now fully customized and optimized your Dynamic Product Ad. Now it is ready to run! Feel free to explore more of our articles on Facebook ads and online marketing, which can help you on your quest for digital marketing mastery!